Manual
New video added to YouTube. It shows the basics in 3 minutes!
How to edit date and time
General
After files are opened you typically get a view like in Fig.1: a preview and two other panels: Original and Target. In this screenshot the built-in tutorial call-outs are switched on. They can be switched off under the Help menu-item.
Entries can be removed from the list using your keyboard delete button. This will not delete files from your disk.
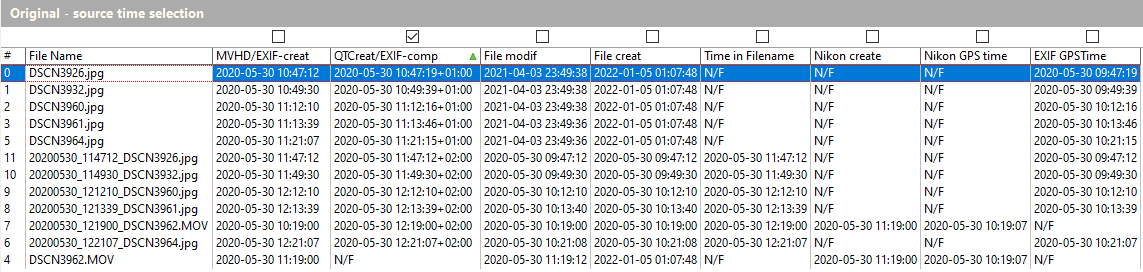
The main purpose of the Original panel is the selection of the field to use as ‘source time’ that will be used for further date-time setting. Especially MP4 files can have several fields containing date-time, most common is the MVHD field. More info is described in the info block.
With the check boxes above the columns in the Original-panel the source time can be selected; this is reflected in the Source time column of the Target-panel.

Select reference ‘root time’
Now we are ready to select the desired time, but you can also select a specific file to serve as root-time. Suppose you took a picture with another camera, with correct time-setting, around the same moment as DSCN3960 in Fig.2. Then you can select this file as reference. How? By selecting the row and clicking the button above the column ‘Source time’.
Select desired time
Now we can change the desired time for this file by selecting fields like year and hour and using the keyboard up-down arrows, see Fig.3.
In this example the only change needed is for daylight saving time. Therefore, about halfway the animation, I reset the change to zero with the DeltaT zero button. After this, I only change the UTC offset to +2, and the hour is increased by 1.
Process changes
After the steps above, we can switch to the Pre-Process tab.
The processed files will be stored in the Target Folder. When files already exist there is a warning. When the checkbox to put date in the filename is checked, a string like YYYYMMDD_HHMMSS will be added to the filename. The checkbox ‘circumvent GP bug’ will rename *.mp4 files to *.mp4.mov. This ensures the values will be read correctly in Google Photos.
The button Go starts the processing and can be monitored in the column write status.
In the next section we will take a look at the results to explain a little bit more about the fields and how data is stored in the files.

Results
The processed files were opened as well, and are shown together with the originals in Fig.5. The files were sorted on the second column by clicking the header.
Info: time fields or tags in MP4 video
Internal metadata
The MP4 video-container-format MP4 is based on, and practically the same, as the Quicktime format (MOV), and data is stored in so-called atoms. The most basic internal timestamp-info is stored in the mvhd-atom as seconds passed since 1904 00:00 Jan 1st UTC time. Most important: no time-zone offset is included in the mvhd atom. In jpg photo files, the basic internal timestamp, if present, is stored in the EXIF block as create date in the DateTimeOriginal field. There is no UTC time-zone offset data in this field.
These two basic values are shown combinedly in column 1: MVHD/EXIF-creat
For video, there is one field that stores the timestamp including the UTC-offset in the Quicktime format: com.apple.quicktime.creationdate. Although I have seen it in a few other files, it is practically only used in Apple mov files, like from an iPhone. For jpg photos there is no such field, but sometimes a GPS timestamp (as UTC) is included. When this is present the UTC-offset can be calculated. I call this EXIF-composite time. When either video or photo timestamp including UTC-offset is present, they are shown combinedly in column 2: QTCreat/EXIF comp.
So, when timestamp+offset is present in a file, this is shown in column 2. And it is this data that is stored by MP4Workshop. See: how it works.
The above are the basic fields. Some extra internal data fields included are Nikon specific, and could be helpful. Next to the above, there are many more methods like XMP, IPTC and a lot of proprietary methods used by camera and software companies. A comprehensive tool to explore all values is Exiftool.
External metadata
Two columns show external data from the filesystem: creation and modification. In some cases one of these could be useful as ‘source time’. One other method is using data included in the filename. I once digitized many DV tapes and stored the files named like: YYYYMMDD_HHMMSS_~~.mp4. In that case the column ‘Time in Filename’ can be used as source time.
Info: under the hood, how MP4Workshop works
The internal metadata of a MP4 or Quicktime MOV file is stored in the moov ‘atom’; in MP4 terminology atoms are called ‘boxes’. The moov atom contains many other atoms, like the header (mvhd), track data (trak) and can also contain metadata in the atoms udta and meta. For example, the com.apple.quicktime.creationdate is stored inside the meta-atom.
Editing inside the moov-atom is not easy. Sometimes this block of data is at the end of the file, but more often it is not. Since it contains many pointers to internal adresses inside the MP4 file, the entire file would have to be rebuild. This would require composing new meta atoms (including your extra data) and rebuilding the moov atom and the entire file. Since 2019 Exiftool can insert Quicktime tags, and it can be done with ffmpeg, but it is not easy.
My main goal was to adjust the metadata without re-encoding. This would be fast and without quality-loss. After a lot of experimenting a came to the solution that is used in MP4Workshop. That is:
1. the entire file is copied, one-on-one
2. the moov atom is renamed to ‘free’ atom (an allowed atom, meaning reserved free space)
3. a rebuild moov atom including the desired metadata is appended at the end of the file
This seems to work perfectly. Another advantage is, should something go wrong, it can be reversed easily: 1. rename the old moov atom from ‘free’ to ‘moov’, 2. remove the added ‘moov’ from the end of the file. This can be done manually with any hex-editor. And this reverse action is also build into MP4Workshop (a tiny button captioned R on the Pre-Process tab).
So far, I have not encounterd any problems. I have a lot of videos that are very precious to me, with several back-ups, and I would not want to ruin them. The process in MP4Workshop does not overwrite your originals, and the one-on-one copy is checked byte-for-byte before adding the rebuild moov atom. Deleting your original material is at your own risk, I still keep mine somewhere. However, in practice I have never encountered an output file that was damaged.